Getting started
ShopNative WP comes ready to run. The project is connected to our demo WooCommerce store, so you can build it and see a working app before you change anything. Then connect your own store in a few steps.
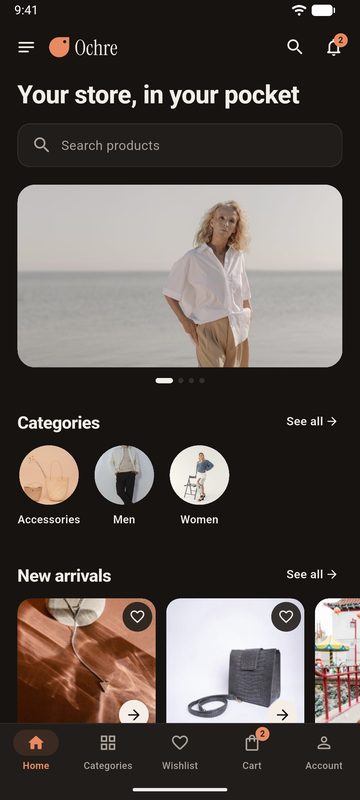
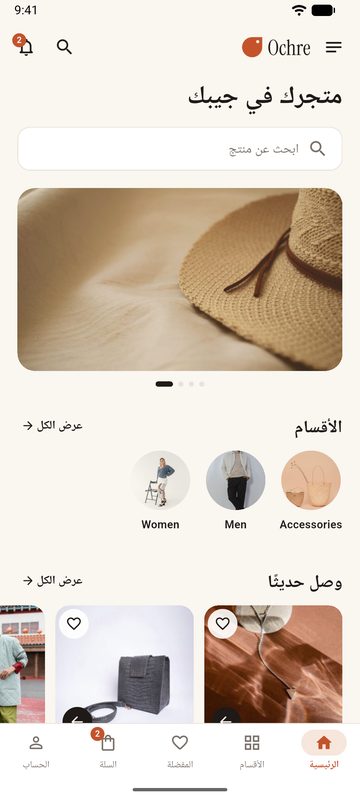
The download has two parts:
| Folder | What it is |
|---|---|
app/ |
The Flutter project (Android and iOS) |
plugin/shopnative-wp.zip |
The ShopNative WP Connector WordPress plugin, installed on your store |
1. Install the tools
- Flutter 3.44 or newer (Dart 3.12+): https://docs.flutter.dev/get-started/install
- Android: Android Studio with the Android SDK (the app runs on Android 7.0 / API 24 and newer)
- iOS (optional): a Mac with Xcode (the app runs on iOS 15 and newer)
Check your setup with flutter doctor.
2. Build the demo app (no changes needed)
Unzip the download and open a terminal in the app folder (the folder that contains pubspec.yaml):
Windows: unzip to a short path such as
C:\dev\ShopNativeWP. Very long folder paths (over 260 characters, e.g. deep inside Downloads or a synced folder) make the Flutter tool fail with "Directory listing failed".
flutter pub get
flutter run                     # on a connected phone, emulator or iOS simulator
Or build an installable APK:
flutter build apk --debug       # → build/app/outputs/flutter-apk/app-debug.apk
flutter build apk --release     # → build/app/outputs/flutter-apk/app-release.apk
The release APK is signed with the debug key until you add your own (see step 4). You can also open the app
folder in Android Studio or VS Code and press Run.
What to try in the demo
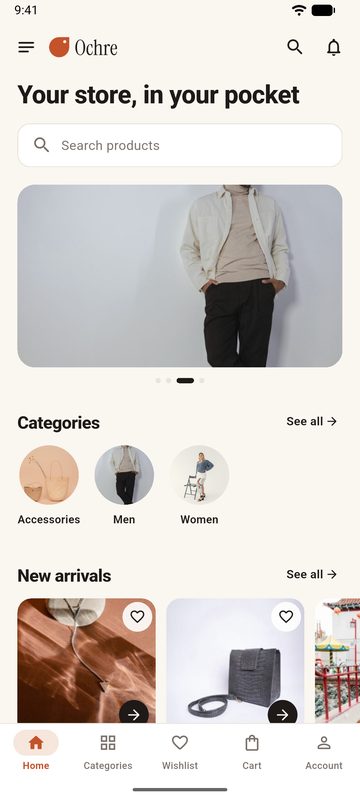
- Home: banners, categories, New arrivals, On sale, category rows, brands and blog posts
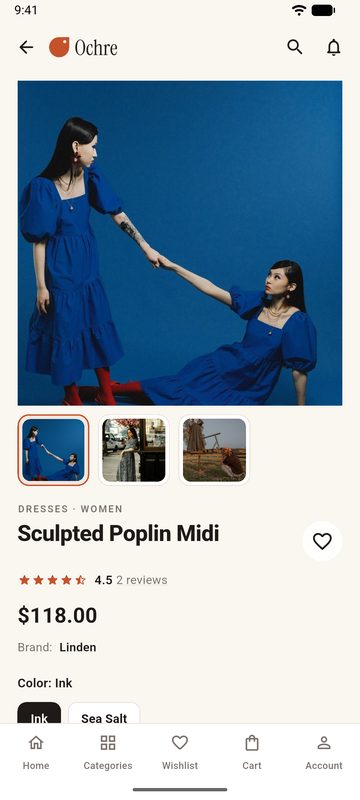
- A category: sort and filters; a product with sizes and colours (sold-out options are struck through)
- Search, wishlist, notifications; Settings (side menu): light / dark mode and English / Arabic (right-to-left)
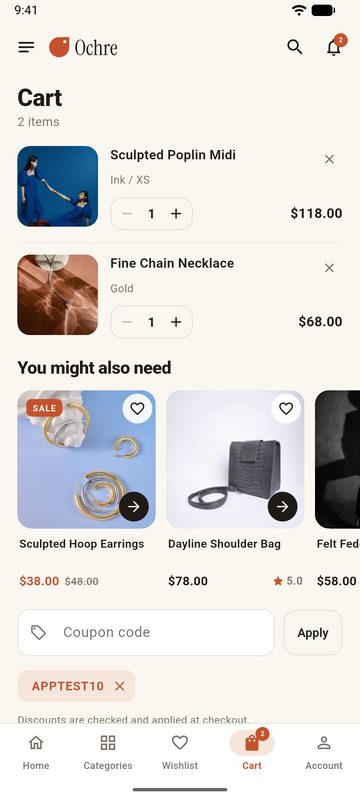
- Cart with a quantity picker and coupon field, then Checkout: the demo store's own checkout page opens in the app; pay with Cash on delivery (it is a demo, nothing is shipped)
- Account: create an account, see your order, edit your addresses, delete the account again
Run the tests (optional)
flutter test
3. Connect your own store
- Install the connector plugin on your WordPress site and check its status page: WooCommerce setup.
- In
assets/app-config.json, replacestore.urlwith your store's address (https://your-store.com). - Change
app.id(for examplecom.yourcompany.store),app.nameandbrand.name, then run:dart run tool/rebrand.dart flutter runagain: the app now shows your products.
Then follow the Rebranding checklist for your logo, app icon and colours, and set your banners, home categories and support contacts in wp-admin → ShopNative WP. Every app setting is described in Configuration.
The demo store is kept online for testing, but it may change at any time: always connect your own store before you publish. The app holds no keys or passwords for the demo store; it only reads its public catalog.
4. Publish
When the app shows your store and your brand, build the release versions:
flutter build appbundle --release --obfuscate --split-debug-info=build/symbols   # Google Play
flutter build ipa --release --obfuscate --split-debug-info=build/symbols         # App Store (on a Mac)
- Android signing: create a keystore, copy
android/key.properties.exampletoandroid/key.propertiesand fill it in (the file explains how). Keep the keystore safe: Google Play needs the same key for every update. - iOS signing: open
ios/Runner.xcworkspacein Xcode → target Runner → Signing & Capabilities → pick your team. - Keep the
build/symbolsfolder of every release: it is needed to read crash reports.
Before you submit: test sign-in, account creation and deletion, checkout with your real payment method, dark mode and your languages on a real device. Apple requires the Delete account option (included) and a privacy policy URL in the store listing.
WooCommerce setup
The app talks to your store in two ways:
- Catalog (products, categories, brands, search): WooCommerce's built-in Store API (
/wp-json/wc/store/v1/). It is public and read-only, so the app needs no API keys. - Accounts and checkout: the ShopNative WP Connector plugin (included in the download as
shopnative-wp.zip). It adds login, registration, profile, orders, addresses, account deletion, the hand-over of the app's cart to your checkout page, and the app settings page in wp-admin.
Requirements
- WordPress 6.4 or newer, PHP 7.4 or newer
- WooCommerce 9.6 or newer (brands need 9.6)
- HTTPS on your store (the app refuses plain
http://addresses, except for local test stores) - Permalinks set to anything but "Plain" (Settings → Permalinks → Post name is a good choice)
1. Install the plugin
- wp-admin → Plugins → Add New → Upload Plugin → choose
shopnative-wp.zip→ Install Now → Activate. - Open ShopNative WP in the wp-admin menu (just below WooCommerce). Under Connect the app, every line should be green:
- Pretty permalinks are on
- The store uses HTTPS
- Customers can create accounts (optional: when off, the app hides "Create account")
- The app API answers
If a line is red, see Troubleshooting.
2. Activate your licence
On your live store, activate the plugin with your Envato purchase code: ShopNative WP → License → paste the code → Activate. You find the code in your Envato account: Downloads → ShopNative WP → Download → "License certificate & purchase code".
- Until the store is activated, the app's sign-in, account, orders, reviews and checkout are switched off and the app shows "This app is not activated yet". Browsing the catalog works.
- One live store per licence (Envato's Regular and Extended licences cover one end product each).
- Development sites need no activation:
localhost,*.local,*.test,staging.…,dev.…and private IP addresses work without a code, and do not use up your licence. - Moving to a new site: on the old site click Deactivate this site, then activate the new site with the same code. Deleting the plugin also frees the code. Lost access to the old site? Email support with your purchase code.
- The plugin checks in with our licence server (
api.devapptics.com) once a week. If the server cannot be reached, nothing changes: an activated store stays activated. - What the licence server receives: the purchase code, your site address and the plugin version. It looks the code up at Envato (buyer username, licence type, support period). Nothing about your customers or orders is sent.
3. Connect the app
In the app project, open assets/app-config.json and put your store address in store.url:
"store": { "url": "https://your-store.com" }
Use the address of your WordPress site (Settings → General → Site Address), without a trailing slash. Then run
flutter run: the app shows your products.
4. App settings in wp-admin
ShopNative WP has the settings the app reads each time it starts (no app update needed):
| Setting | What it does |
|---|---|
| Banners | Images at the top of the home screen, each with a title and a link (see Links). Size: 1600 × 900 px. When there are none, the banners in app-config.json are used. |
| Categories on the home screen | Which category rows the home screen shows. Leave all unticked for the largest top-level categories. |
| Support contacts | Email, phone and WhatsApp shown on the Contact screen and used by "Call for price". When empty, the values in app-config.json are used. |
| App mode | Hides your theme's header and footer on the checkout pages opened in the app (the app has its own). |
| Stay signed in for | How many days a login in the app stays valid. |
| Integrations | Extra features, each with an on/off switch. An integration only runs when the plugin it needs is active. See INTEGRATIONS.md. |
5. Checkout and payments
When a customer taps Checkout, the app sends its cart to the plugin, which fills the WooCommerce cart (signed in as the customer, when they are) and opens your normal checkout page inside the app. Prices, stock and coupons are checked again by WooCommerce there. When the order is placed, the app sees the thank-you page, closes the checkout and shows its own confirmation.
So every payment gateway works without app changes: card forms, cash on delivery, bank transfer, and gateways that send the customer to another site or app and back (PayPal, local wallets, 3-D Secure). Test your gateway once with a test order before you publish.
- Shipping estimate in the cart: customers pick a country (and state / postcode; signed-in customers use their saved address) and see your shipping methods, taxes, coupon discounts and the estimated total, calculated by WooCommerce itself from your shipping zones and tax settings. The method they pick is preselected at checkout.
- Both the classic (shortcode) and the block checkout page work.
- Coupons entered in the app's cart are applied on the checkout page; invalid ones show WooCommerce's message.
- If a gateway opens another app (a bank or wallet app), the app hands that link to the phone.
6. Accounts
- Sign in with the WordPress username or email and password. Create account follows WooCommerce → Settings → Accounts & Privacy ("Allow customers to create an account on the My account page").
- "Forgot your password?" opens your store's lost-password page. Signed-in customers change their email and password in Account → Profile (confirmed with their password; WordPress sends its usual notification emails).
- Downloads: files from downloadable products appear under Account → Downloads, with the downloads left and the expiry date you set on the product. "Download" opens WooCommerce's protected download link in the browser. If "Downloads require login" is on (WooCommerce → Settings → Products → Downloadable products), the customer has to sign in on the website in the browser first; leaving it off is simpler for app customers (links are still private: each one includes the order key and the customer's email).
- Delete account (required by Apple for apps with sign-up) asks for the password and deletes the WordPress user. Orders stay in WooCommerce for your records.
Products: reviews, upsells and cross-sells
- Reviews and ratings follow WooCommerce → Settings → Products → Reviews: when reviews are on, customers who are signed in can write one in the app (with stars when ratings are on; only buyers when "verified owners only" is on). New reviews follow WordPress's comment moderation (Settings → Discussion), like reviews from the website, and you get the same notification emails.
- Upsells (Product data → Linked Products) show as "You may also like" on the product screen; cross-sells as "You might also need" in the cart.
- Filters: the app's filter sheet lists your global attributes (Products → Attributes), e.g. Color and Size. Attributes made only inside one product ("custom product attributes") cannot be filtered.
Links
Banners (in wp-admin and app-config.json) and push notifications use the same links:
| Link | Opens |
|---|---|
category:clothing |
a category (by its slug) |
product:hoodie or product:42 |
a product (by slug or ID) |
tag:summer-sale |
the products with that tag (by its slug) |
search:summer dress |
search results |
blog:15 |
a blog post (Blog integration) |
cart, home, categories, account |
that screen |
https://your-store.com/product/hoodie/ |
the matching screen for addresses of your store (products, categories, cart, shop, search) |
any other https:// address |
the page in the in-app browser |
Troubleshooting
"This app is not activated yet" / activation fails
- Activate the plugin on the live store (see Activate your licence).
- "This purchase code is already active on …": deactivate it on that site first, or email support with your code.
- "Could not reach the licence server": your host blocks outgoing connections from WordPress. Ask your host to allow
HTTPS requests to
api.devapptics.com. - "The licence check is busy right now": Envato's API is busy; try again in a few minutes.
"The app API did not answer" / the app says it cannot reach the store
A security plugin (Wordfence, iThemes, …), a firewall (Cloudflare, Sucuri) or a host rule blocks the WordPress REST
API. Allow /wp-json/shopnative/v1/ and /wp-json/wc/store/v1/ (and /wp-json/wp/v2/posts for the Blog
integration). Open https://your-store.com/wp-json/wc/store/v1/products in a browser: you should see JSON.
"A cache plugin or your host cached the app API"
The page cache serves old answers. Exclude /wp-json/ and the cart, checkout and my-account pages, plus addresses
containing snwp_checkout, from your page cache (LiteSpeed Cache, WP Rocket, W3 Total Cache, Cloudflare APO,
host caches). The plugin already tells LiteSpeed Cache and WP Rocket not to cache them, and purges caches on
activation.
Checkout shows an empty cart, an old cart or the wrong customer Same cause: the checkout page is cached. See the previous answer.
Checkout shows my theme's header and menu
Turn on App mode in ShopNative WP. If your theme uses unusual class names, add CSS with the
snwp_app_mode_css filter (see INTEGRATIONS.md).
Sign in fails with the right password
Some security plugins block REST logins or add a captcha to them. Allow /wp-json/shopnative/v1/auth/. Two-factor
login plugins are not supported for app sign-in.
Images are missing or slow
The app shows the images WooCommerce sends (woocommerce_thumbnail in lists). Regenerate thumbnails after changing
image sizes. With Jetpack's image CDN (i0.wp.com), the app asks for images sized to the screen.
A feature is missing in the app (shipping estimate, downloads, changing email/password) or the app asks to
"update the plugin"
The app shows these only when the store's ShopNative WP Connector plugin is new enough to support them. Upload the
shopnative-wp.zip from the same download as your app (Plugins → Add New → Upload Plugin → "Replace current with
uploaded"); your settings are kept.
"Plain" permalinks Choose Settings → Permalinks → Post name and save.
The app shows a product as available but checkout says it is out of stock The app's catalog can be a few minutes old (it is cached for offline use); WooCommerce always checks stock at checkout, so nothing is oversold. Pull down on a screen to refresh.
Configuration reference
The app is configured in one file: assets/app-config.json, plus the settings page in wp-admin
(ShopNative WP) for things you may want to change without an app update: banners, home
categories, support contacts and integrations. No Dart code changes are needed.
After editing app-config.json:
- Android: just rebuild (
flutter run/flutter build). Android reads the app identity directly from this file. - iOS: run
dart run tool/rebrand.dartonce after changing theappsection or the colours, then rebuild.
Text values starting with YOUR_ are treated as empty.
app: identity
| Key | Example | Notes |
|---|---|---|
id |
com.yourbrand.store |
Package name (Android) and bundle ID (iOS). Cannot be changed after the first store upload. |
name |
Your Store |
Name under the app icon. |
version |
1.0.0 |
Version shown in the stores. |
build |
1 |
Increase by 1 for every upload to Google Play / App Store. |
store: your WooCommerce store
| Key | Example | Notes |
|---|---|---|
url |
https://your-store.com |
Your WordPress site address (Settings → General → Site Address). Must be https://. |
That is all: the app needs no API keys. See WOOCOMMERCE_SETUP.md for the plugin.
brand
| Key | Notes |
|---|---|
name |
Store name in the app (footer, messages, the header when there is no logo). |
tagline |
Large heading at the top of the home screen and on the startup screen. Optional. Plain text, or one text per language: {"en": "Your store, in your pocket", "ar": "متجرك في جيبك"}. |
logoAsset / logoAssetDark |
Header logo bundled in the app (PNG, about 600 px wide), for light and dark mode. |
symbolAsset / symbolAssetDark |
Startup screen symbol (PNG, about 480 px). |
logoUrl |
Header logo from a URL, used when no logoAsset is set. If neither is set, the name is shown as text. |
themeMode |
system, light or dark: the default before the user picks one in Settings. |
headingFont |
Font of the large headings: InstrumentSerif (included), another font you add to pubspec.yaml, or "" for the system font in bold. |
colors |
Light mode colours (below). |
darkColors |
Dark mode colours, same keys. Optional: derived from colors when missing. |
Colours (#RRGGBB or #AARRGGBB):
| Key | Used for |
|---|---|
primary |
Buttons, selected tab, links, badges |
primarySoft |
Light tint for selected states and icon circles (derived from primary if omitted) |
onPrimary |
Text on primary buttons. Use dark text when primary is light. |
textPrimary |
Headings, prices and important text (also the quick-add buttons) |
textSecondary |
Body text, hints, captions |
background |
Screen background (also the Android launch screen, via tool/rebrand.dart) |
surface |
Cards, inputs, bottom bar, sheets |
border |
Outlines of inputs, chips and buttons |
icon |
Top bar and list icons |
favorite |
Active wishlist heart |
sale |
"Sale" tag and sale prices |
error |
Error messages and destructive actions |
Check contrast: text on background and onPrimary on primary should be at least 4.5 : 1.
Another headings font: put the .ttf file in assets/fonts/, add it under fonts: in pubspec.yaml (see
the InstrumentSerif entry) and set headingFont to its family name. Check that the font licence allows use in
apps (Google Fonts are fine).
i18n: languages
| Key | Example | Notes |
|---|---|---|
languages |
["en", "ar"] |
Languages users can pick in Settings. Each needs assets/i18n/<code>.json. |
defaultLanguage |
en |
Language on first start. |
Right-to-left layout is automatic for Arabic, Persian, Hebrew and Urdu. To add a language, copy assets/i18n/en.json
to e.g. fr.json, translate the values (keep the keys and {placeholders}), and add "fr" to languages.
Keys ending in .one are the singular forms ("1 item"). The test suite checks that every language has all keys.
Product names, descriptions and categories come from your store as they are (the app's own texts are translated by these files). A multilingual catalog (WPML, Polylang) needs an integration; see INTEGRATIONS.md.
home
| Key | Notes |
|---|---|
categories |
Category slugs for the home screen rows, in order, e.g. ["clothing", "accessories"]. Empty: the categories ticked in wp-admin, else the largest top-level ones. |
sections |
How many category rows the home screen shows when none are picked. Default 4. |
banners |
Banners bundled in the app, see below. Banners set in wp-admin replace these when there are any. |
Banners (home.banners, optional):
{
  "link": "category:new-arrivals",
  "image": "https://your-store.com/wp-content/uploads/banner.jpg",
  "eyebrow": { "en": "New season", "ar": "موسم جديد" },
  "headline": { "en": "Wear the light", "ar": "ارتدِ النور" },
  "button": { "en": "Shop now", "ar": "تسوّق الآن" }
}
| Key | Notes |
|---|---|
link |
What opens on tap: category:<slug>, product:<slug>, a page of your store or any web address. All forms: Links. |
image |
URL (upload to Media → Add New and copy the file URL) or a bundled path starting with assets/. 1600 × 900 px, JPG/WebP under 300 KB. |
title |
Name read out by screen readers. Optional (the headline is used). |
eyebrow, headline, button |
Optional text drawn over the image. A plain string, or one value per language. |
With text, keep the left 45 % of the photo calm (the text sits there) and the subject on the right. In right-to-left languages the photo is mirrored automatically.
support
title, address, phone, whatsapp, email. Shown on the Contact screen and used by "Call for price".
Empty values are hidden. Contacts set in wp-admin (ShopNative WP → Support contacts) take priority.
Products without a price (price 0) show Call for price, which contacts the store by WhatsApp, phone or email (the first one set).
Rebranding checklist
Turn ShopNative WP into your store's app in about an hour. ("Ochre" is the demo brand: replace its name, logo and icon with yours.)
1. Identity and store
- Edit
assets/app-config.json:app(id, name, version),store.url,brand.nameandbrand.tagline. - Run:
dart run tool/rebrand.dart --check   # validates the config and shows what will change
dart run tool/rebrand.dart           # applies it to the native projects, pubspec and launch screen
2. Logo
Replace these PNG files (keep the names, or change the paths in brand):
| File | Size | Shown |
|---|---|---|
assets/brand/logo.png |
~600 px wide, transparent | Top bar and side menu, light mode |
assets/brand/logo-dark.png |
same | Top bar and side menu, dark mode (light-coloured logo) |
assets/brand/symbol.png |
~480 px, transparent | Startup screen, light mode |
assets/brand/symbol-dark.png |
same | Startup screen, dark mode |
No logo yet? Delete logoAsset and logoAssetDark from the config: the top bar shows your store name in the
heading font.
3. App icon
- Replace
assets/brand/app-icon.png: 1024 × 1024, square, no transparency, no rounded corners (iOS and Android round it themselves). Keep the important part inside the middle 60 %. - Replace
assets/brand/app-icon-foreground.png: the same artwork on a transparent background, inside the middle 66 % (Android adaptive icon layer), and setadaptive_icon_backgroundinpubspec.yamlto your icon's background colour. - Run
dart run flutter_launcher_icons.
4. Colours and font
Set brand.colors and brand.darkColors (see CONFIGURATION.md), and optionally
brand.headingFont. Run dart run tool/rebrand.dart again so the launch screen colour matches.
5. Home screen
In wp-admin → ShopNative WP: add banners (1600 × 900 px), tick the categories for the home screen and fill in your support contacts. Give your categories images (Products → Categories) so they look good in the app. Switch on the integrations you want (Brands, Blog, Sale countdown).
6. Texts and languages
All app texts are in assets/i18n/*.json. Change wording there; add or remove languages in i18n.languages.
7. Store listing
Before publishing: test sign in, account creation and deletion, add to cart, checkout with your real payment method, and dark mode / your languages on a real device. Then build:
flutter build appbundle --release --obfuscate --split-debug-info=build/symbols   # Google Play
flutter build ipa --release --obfuscate --split-debug-info=build/symbols         # App Store (on a Mac)
Keep the build/symbols folder of every release: it is needed to read crash reports.
Integrations
An integration adds support for another WooCommerce plugin, or a feature, without editing the app's screens or the connector plugin's code. It is one module on each side:
| Side | Where | What it does |
|---|---|---|
| WordPress | a class extending SNWP_Integration (in the connector plugin, or in your own plugin) |
adds data to products or the cart, its own API routes, and settings for the app |
| App | a class extending Integration in lib/integrations/<name>/, plus one line in lib/integrations/registry.dart |
adds widgets to the screens, reacts to events, opens its own screens |
The two share an ID (e.g. brands). The app turns an integration on only when the store says it is active, so
the store owner switches it on and off in wp-admin (ShopNative WP → Integrations) without an app
update.
Many plugins need no integration at all: everything that happens on the checkout page (payment gateways, shipping methods, checkout fields, coupons, taxes, gift cards at checkout) already works, because the app opens your store's real checkout page.
Included integrations
| ID | Name | What it does |
|---|---|---|
brands |
Brands | WooCommerce's built-in brands (Products → Brands): the brand under a product's price and a "Shop by brand" row on the home screen. |
blog |
Blog | Your latest posts as a "From the blog" row on the home screen, opened in the app. Links blog:<id> open a post. Number of posts: snwp_blog_posts filter (default 6). |
shipment_tracking |
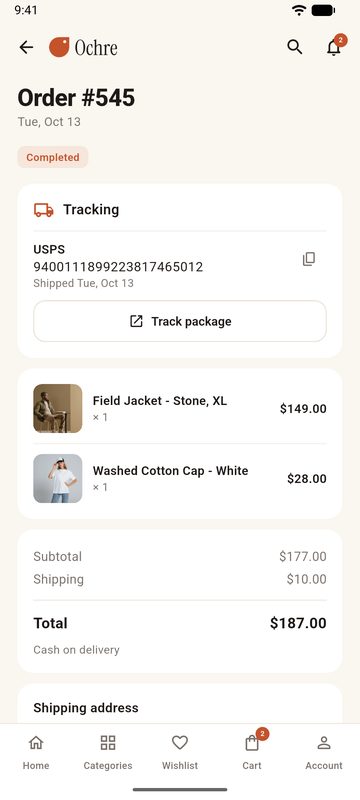
Shipment tracking | Tracking numbers on the app's order screen (carrier, number, ship date, "Track package"), from Advanced Shipment Tracking for WooCommerce (free) or WooCommerce's Shipment Tracking extension. Switches on when one of them is active. |
sale_schedule |
Sale countdown | "Sale ends in 2 days" under the price of products with a scheduled sale. The smallest complete example; read it first. |
Source: plugin/shopnative-wp/integrations/ and app/lib/integrations/.
How it fits together
WordPress                                          App
SNWP_Integration (id "my_badges")                  Integration (id "my_badges")
  is_available()  → is the other plugin active?
  register()      → extend_products(...)    ───►     product.extensions['my_badges']
  config()        → GET /config features.my_badges ► settingsFrom(server); switched on only when listed
  own routes      → /shopnative/v1/my_badges/... ──►  connector.integrationCall('my_badges', ...)
                                                     build(slot)  → widgets on the screens
                                                     onEvent(...) → analytics, pixels, push tags
                                                     routeFor(link) → its own screens / app links
Example: a product badge
A store marks some products with a custom field _badge ("Bestseller", "Eco"). We show it under the price.
1. WordPress side
In your own small plugin (so updates of the connector never overwrite it), or in a child theme's functions.php:
<?php
/**
 * Plugin Name: My app badges
 */
add_action( 'plugins_loaded', function () {
	if ( ! class_exists( 'SNWP_Integration' ) ) {
		return; // ShopNative WP Connector is not active.
	}

	class My_Badges_Integration extends SNWP_Integration {
		public function id(): string    { return 'my_badges'; }
		public function title(): string { return 'Product badges'; }
		public function description(): string { return 'Shows the badge field under the price in the app.'; }

		public function register(): void {
			$this->extend_products( function ( $product ) {
				return array( 'label' => (string) $product->get_meta( '_badge' ) );
			} );
		}
	}

	add_filter( 'snwp_integrations', function ( $list ) {
		$list[] = new My_Badges_Integration();
		return $list;
	} );
} );
Check it: https://your-store.com/wp-json/wc/store/v1/products now has "extensions": {"my_badges": {"label": "…"}}
on every product, and https://your-store.com/wp-json/shopnative/v1/config lists my_badges under features.
2. App side
lib/integrations/my_badges/my_badges_integration.dart:
import 'package:flutter/material.dart';

import '../../config/theme.dart';
import '../../data/json.dart';
import '../../data/models/product.dart';
import '../integration.dart';

class MyBadgesIntegration extends Integration {
  const MyBadgesIntegration();

  @override
  String get id => 'my_badges';

  @override
  List<Widget> build<T>(BuildContext context, Slot<T> slot, T data) {
    if (slot != Slots.productBelowPrice) return const [];
    final label = str(obj((data as Product).extensions[id]), 'label');
    if (label.isEmpty) return const [];
    return [Text(label, style: TextStyle(fontWeight: FontWeight.w700, color: context.colors.primary))];
  }
}
Add it to lib/integrations/registry.dart:
List<Integration> compiledIntegrations() => [
      const SaleScheduleIntegration(),
      const BrandsIntegration(),
      const BlogIntegration(),
      const MyBadgesIntegration(), // ← one line
    ];
Run the app: products with a badge show it under the price. Turn the integration off in wp-admin and it disappears (after the app's next start or pull-to-refresh).
App reference
Integration
Override only what you need; every method is called inside a try/catch, so a failing integration never breaks the app (errors are printed in debug builds).
| Member | Use |
|---|---|
id |
Same ID as the WordPress side. |
needsServer |
false for app-only integrations (always on, e.g. an analytics SDK). Default true. |
settingsFrom(server) |
This integration's values from config() on the WordPress side. |
init(IntegrationContext) |
Called once when the integration is switched on: config, server, storeApi, connector. |
build(context, slot, data) |
Widgets for a place on the screens (below). Return const [] for other slots. |
routeFor(Uri link) |
A screen for a link the app does not know (e.g. badges:42), from banners, notifications or web pages. |
onEvent(AppEvent) |
Things that happen in the app (below). |
onCheckoutNavigation(Uri) |
Decide about a page the checkout webview is about to open: proceed, prevent or openOutside (e.g. a wallet app link). |
Slots: places on the screens
| Slot | Data | Where |
|---|---|---|
Slots.productBelowPrice |
Product |
Under the price on the product screen (brand, countdown, "Buy now, pay later") |
Slots.productTabs |
Product |
Extra sections on the product screen; return ProductTab(title: …, child: …) widgets |
Slots.homeSections |
HomeData |
Extra sections on the home screen, above "All products" |
Slots.cartBelowItems |
List<CartLine> |
Under the cart lines (free shipping bar, gift message) |
Slots.accountMenu |
Customer? |
Extra entries on the account screen (null when signed out) |
Slots.drawerMenu |
null |
Extra entries in the side menu |
Sections that load data (like Brands and Blog) can use IntegrationLoader (lib/integrations/loader.dart): it
shows the saved copy at once, then the fresh one, and reloads on pull-to-refresh.
Events
ProductViewed, AddedToCart, CheckoutStarted, OrderPlaced (order ID, key and summary), LoggedIn,
LoggedOut. Use them for analytics, ad pixels or push tags.
Data and requests
product.extensions[id]: what the WordPress side added withextend_products().context.readStore.storeApi: the catalog (fetchProducts,fetchBrands,fetchPosts, …), with offline cache.context.readStore.connector.integrationCall(id, 'GET', '/path', token: context.readStore.customerToken): the integration's own routes on the WordPress side.- Navigation:
context.shell.openProduct(…),openCategory(…),openProducts(title, ProductQuery(…)),open(widget),openStoreLink('category:…').
WordPress reference
SNWP_Integration
| Method | Use |
|---|---|
id() |
Lowercase with underscores; the app uses the same ID. |
title(), description() |
Shown in wp-admin under Integrations. |
is_available() |
Whether the plugin it needs is active (e.g. class_exists( 'Some_Plugin' )). Unavailable integrations show "Plugin not active". |
register() |
Hooks in. Runs only when available and switched on. |
config() |
Values for the app, sent in GET /config under features.<id>. |
extend_products( $callback, $schema ) |
Adds data to every product in the Store API (product.extensions.<id>). The callback gets a WC_Product. |
extend_cart( $callback, $schema ) |
Adds data to the Store API cart (cart.extensions.<id>). |
Register with the snwp_integrations filter, at the latest on init priority 19 (the connector collects
integrations on init priority 20).
Own API routes
add_action( 'snwp_rest_routes', function ( $namespace ) {
	register_rest_route( $namespace, '/my_badges/list', array(
		'methods'             => 'GET',
		'callback'            => 'my_badges_list',
		'permission_callback' => array( 'SNWP_Rest', 'require_user' ), // or '__return_true' for public data
	) );
} );
With SNWP_Rest::require_user, the app's signed-in customer is the current WordPress user in your callback.
Plugin hooks
| Hook | Type | Arguments | Use |
|---|---|---|---|
snwp_integrations |
filter | SNWP_Integration[] |
Add integrations. |
snwp_rest_routes |
action | $namespace |
Register routes under shopnative/v1. |
snwp_config |
filter | array $config |
Change what GET /config sends to the app. |
snwp_checkout_lines |
filter | array $lines, WP_REST_Request $request |
Change the cart lines before the checkout code is made. |
snwp_before_checkout_redirect |
action | array $data |
Runs after the app's cart is put in the WooCommerce cart, before the redirect to checkout. |
snwp_checkout_redirect |
filter | string $url, array $data |
Send the app to another checkout page. |
snwp_order_placed |
action | WC_Order $order |
An order was placed from the app (also tagged with the meta _snwp_source = app). |
snwp_app_mode_css |
filter | string $css |
CSS that hides the theme's header and footer in the app's checkout. |
snwp_customer_data |
filter | array $data, WC_Customer $customer |
Profile data sent to the app. |
snwp_order_data |
filter | array $data, WC_Order $order |
Order data sent to the app. |
snwp_login |
action | WP_User $user |
A customer signed in from the app. |
snwp_registered |
action | int $user_id |
A customer created an account in the app. |
snwp_delete_account |
filter | null, WP_User $user |
Replace account deletion with your own process: return true (done) or a WP_Error. |
snwp_token_lifetime |
filter | int $seconds, int $user_id |
How long an app login stays valid. |
snwp_client_ip |
filter | string $ip |
The visitor IP used for rate limits (behind a proxy). |
snwp_blog_posts |
filter | int $count |
Number of posts for the Blog integration. |
Ideas for more integrations
Product add-ons and extra options, YITH / TI wishlist sync, multi-currency, WPML / Polylang, social login, points and rewards, vendor info (Dokan, WCFM), product videos, size charts, "Buy now, pay later" messages.
Push notifications add-on (optional)
Send notifications ("New arrivals are in", "Summer sale -30 %") from the free Firebase console. Tapping a notification can open a product, a category, a blog post or the cart.
ShopNative WP ships without Firebase, so the app works without any Firebase account or setup files. Enabling this add-on takes about 20 minutes and adds Firebase Messaging (about 0.3 MB on Android).
Costs: Firebase is a third-party service from Google and is not part of the ShopNative WP purchase. You use it with your own Firebase account, and you are responsible for any fees for using Firebase, now or if Google changes its pricing. Firebase Cloud Messaging is free at the time of writing, but other Firebase services or a paid plan (Blaze) may be charged. Check https://firebase.google.com/pricing before you enable the add-on.
Order updates ("Your order has shipped") keep coming by email from WooCommerce as before; this add-on is for messages you send yourself.
1. Create a Firebase project
- Go to https://console.firebase.google.com → Add project.
- Install the tools (once):
dart pub global activate flutterfire_cli npm install -g firebase-tools # or see https://firebase.google.com/docs/cli firebase login - In the
appfolder, run and pick your Firebase project, Android and iOS:
This createsflutterfire configurelib/firebase_options.dartand the Firebase config files for Android and iOS.
2. Add the packages and the code
flutter pub add firebase_core firebase_messaging
Copy addons/push/push_notifications.dart to lib/addons/push_notifications.dart.
In lib/main.dart, start it after the store is created:
import 'addons/push_notifications.dart';

Future<void> main() async {
  // ... existing lines ...
  runApp(ShopNativeApp(store: store));
  store.refresh();
  PushNotifications.init(onMessage: store.addMessage); // ← add this line
}
3. Android
Android 13 and newer ask the user for permission; the add-on does that on first start. Nothing else is needed:
flutterfire configure already added the Google services files.
4. iOS (needs an Apple Developer account)
- In Xcode, open
ios/Runner.xcworkspace→ target Runner → Signing & Capabilities → add Push Notifications and Background Modes → Remote notifications. - In the Apple Developer portal create an APNs Authentication Key (.p8).
- Firebase console → Project settings → Cloud Messaging → Apple app configuration → upload the key, with your Key ID and Team ID.
5. Send a notification
Firebase console → Messaging → New campaign → Notifications:
- Title and text as you like.
- Target: Topic
all(every app user is subscribed). - Additional options → Custom data: key
link, value one of:
| Value | Opens |
|---|---|
product:hoodie or product:42 |
a product (by its slug or ID) |
category:clothing |
a category (by its slug) |
search:summer dress |
search results |
blog:15 |
a blog post (by its ID; needs the Blog module in ShopNative WP) |
cart, home, account |
that screen |
https://your-store.com/product/hoodie/ |
the matching screen for pages of your store |
https://… (another site) |
the page in the in-app browser |
Slugs and IDs are shown in wp-admin (Products → All Products: hover a product for its ID; the slug is the last part of its address).
Messages that arrive while the app is open are added to the in-app notifications list (bell icon).
Testing
Run the app in debug mode: the device's push token is printed in the console (Push token: …). In the Firebase
console use Send test message with that token.
Removing it again
Delete lib/addons/push_notifications.dart, the PushNotifications.init line, run
flutter pub remove firebase_core firebase_messaging, and delete lib/firebase_options.dart and the Firebase
config files.
Changelog
1.0.0
First release.
- Native WooCommerce app for Android and iOS from one Flutter codebase, with the ShopNative WP Connector plugin.
- Catalog from WooCommerce's Store API: no API keys in the app.
- Home: banners (set in wp-admin), categories, New arrivals, On sale, category rows; Brands and Blog sections.
- Categories, product lists with sort and filters (on sale, in stock, price, attributes), search with instant results.
- Product page: gallery with zoom, variations (sold-out aware), grouped and external products, quantity picker, description and details, related products, call for price.
- Product reviews and star ratings; customers write reviews in the app (store's review settings and moderation).
- Filter by attribute (Color, Size…); upsells ("You may also like") and cross-sells in the cart.
- Cart with quantity, coupons and a shipping estimate (methods, taxes, total); wishlist; notifications.
- Checkout on the store's own checkout page inside the app: every payment gateway, shipping method and checkout plugin works; order confirmation in the app.
- Customer accounts: sign in, register, profile (name, email, password), orders with details and tracking numbers, addresses, downloads, delete account.
- Tags: tappable on products; links to a tag's products.
- Integrations: one module in the app and one in the plugin per feature, switched on in wp-admin (Brands, Blog, Sale countdown included). Developer guide in docs/INTEGRATIONS.md.
- Warm, minimal design, light/dark mode, multiple languages with right-to-left support (English and Arabic included).
- Works offline from cache. One configuration file;
tool/rebrand.dartfor the native projects. - Optional push notifications add-on (Firebase).
Licenses
ShopNative WP
The ShopNative WP app source code is licensed to you under the CodeCanyon / Envato Market licence you purchased (Regular or Extended). See https://codecanyon.net/licenses/standard.
The ShopNative WP Connector WordPress plugin (plugin/shopnative-wp.zip) is licensed under the GNU General
Public License v2 or later, like WordPress and WooCommerce (see the plugin's readme.txt).
Brand assets
The "Ochre" logo, symbol and app icon in assets/brand/ were created for the ShopNative WP demo and may be
replaced freely. "Ochre" is a fictional demo brand.
Headings font
Instrument Serif (assets/fonts/), Copyright 2022 The Instrument Serif Project Authors, licensed under the SIL Open
Font License 1.1 (assets/fonts/OFL.txt). The licence is also shown in the app under Settings → Open-source licenses.
Demo content
The product photos, banners and blog images seen in the demo store and screenshots come from the demo store and are
not included in this download. Use your own images. See docs/DEMO_CREDITS.md.
Open-source packages
All packages used by the app have permissive licences (BSD, MIT, Apache 2.0). Their notices are shown in the app under Settings → Open-source licenses (Flutter collects them automatically).
Direct dependencies:
| Package | Version | Licence |
|---|---|---|
| flutter | SDK | BSD-3-Clause |
| flutter_localizations | SDK | BSD-3-Clause |
| flutter_secure_storage | 11.2.0 | BSD-3-Clause |
| http | 1.6.0 | BSD-3-Clause |
| path_provider | 2.1.6 | BSD-3-Clause |
| shared_preferences | 2.5.6 | BSD-3-Clause |
| url_launcher | 6.3.3 | BSD-3-Clause |
| webview_flutter | 4.14.1 | BSD-3-Clause |
Including transitive packages: BSD-3-Clause ×64, Apache-2.0 ×2, MIT ×1 (plus the Flutter SDK).
Icons: Material Icons (Apache 2.0), bundled with Flutter. Fonts: Instrument Serif for headings (see above); the device's system font for everything else.
Credits: demo content
Demo store
The demo store sells a made-up catalog under the demo brand Ochre (brands Linden, Northwind and Atlas Supply are made up too). Its product, category, banner and blog photos are from Pexels (free for commercial use). They are loaded from the demo store and are not part of this download. Use your own content for your store.
Brand assets
The "Ochre" logo, symbol and app icon in assets/brand/ were made for this demo and may be replaced freely.
"Ochre" is a fictional brand.
Fonts
- Instrument Serif (headings in the app): SIL Open Font License 1.1,
assets/fonts/OFL.txt.
See LICENSES.md for the open-source packages.
Support
Most questions are answered in this documentation; see Troubleshooting first.
If you need help, contact us with your purchase code, your Flutter version (flutter --version), your store address,
the WooCommerce and WordPress versions, and a screenshot or the error message:
- Email: hello@devapptics.com
- Phone: +1 (213) 658-4875
- WhatsApp: +1 (213) 658-4875
- Or use the comments / support tab on the CodeCanyon item page.
Support covers questions about the item, bugs, and help with the setup described here. Custom changes and installation services are not part of item support.
Installation and publishing service (paid, optional)
If you prefer, we can set up and publish the app for you. This is a separate paid service, quoted per project; it is not included in the item price.
What we do
- Install and set up the ShopNative WP Connector plugin and connect the app to your WooCommerce store
- Apply your app name, package name, logo, app icon, colours and languages
- Build the release versions for Android and iOS
- Prepare the store listings and submit the app to Google Play and the App Store
What you provide
- Your purchase code
- A WordPress administrator account for your store (you can remove it when we are done)
- App name, logo (PNG or SVG), app icon (1024 × 1024 px) and brand colours
- Your own Google Play Console account (one-time Google fee), with us invited as a user
- Your own Apple Developer Program account (yearly Apple fee), with us invited in App Store Connect
- Store listing texts: short and full description, support email and your privacy policy URL
The developer accounts stay in your name, so you keep full ownership of your apps. Store review times are set by Google and Apple.
To request a quote, email hello@devapptics.com with the subject "ShopNative WP setup" and your purchase code.